


What is Terraform?
Terraform is an open-source infrastructure as a code (IAC) tool that allows to create, manage & deploy the production-ready environment. Terraform codifies cloud APIs into declarative configuration files. Terraform can manage both existing service providers and custom in-house solutions.
In this project, I have used some variables also that I will discuss later in this article.
Step 1:- Create a file for the VPC
Create vpc.tf file and add the below code to it
  # Creating VPC
  resource "aws_vpc" "demovpc" {
    cidr_block       = "${var.vpc_cidr}"
    instance_tenancy = "default"
  tags = {
    Name = "Demo VPC"
  }
  }
Step 2:- Create a file for the Subnet
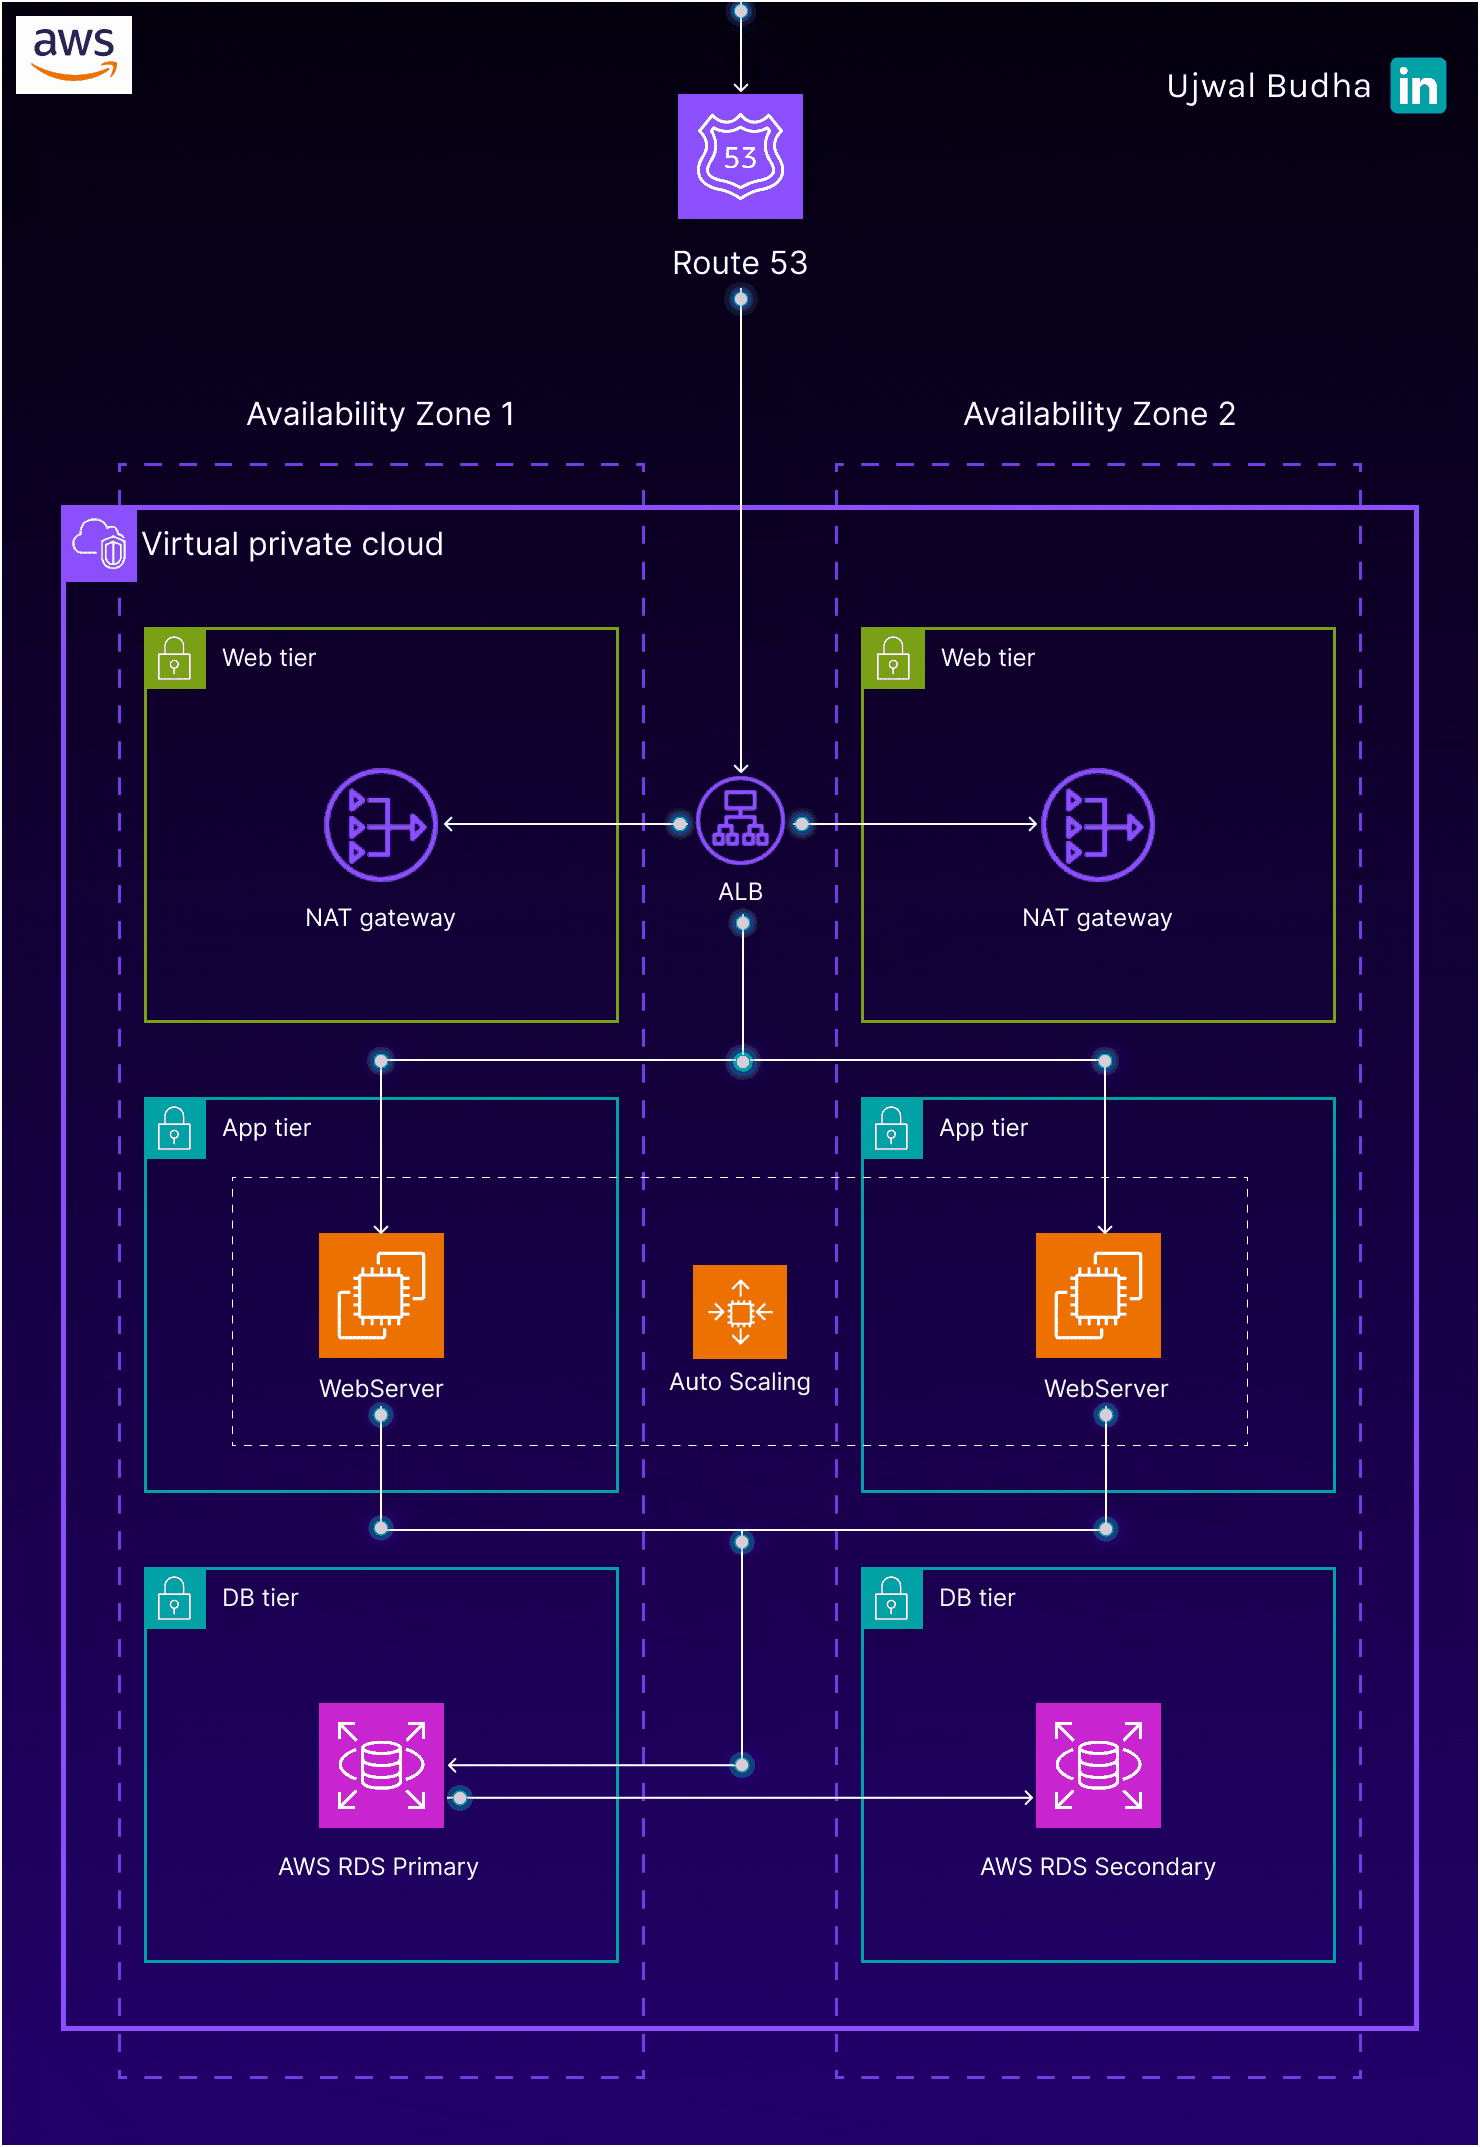
For this project, I will create total 6 subnets for the front-end tier and back-end tier with a mixture of public & private subnet
Create subnet.tf file and add the below code to it
  # Creating 1st web subnet
  resource "aws_subnet" "public-subnet-1" {
    vpc_id                  = "${aws_vpc.demovpc.id}"
    cidr_block             = "${var.subnet_cidr}"
    map_public_ip_on_launch = true
    availability_zone = "us-east-1a"
  tags = {
    Name = "Web Subnet 1"
  }
  }
  # Creating 2nd web subnet
  resource "aws_subnet" "public-subnet-2" {
    vpc_id                  = "${aws_vpc.demovpc.id}"
    cidr_block             = "${var.subnet1_cidr}"
    map_public_ip_on_launch = true
    availability_zone = "us-east-1b"
  tags = {
    Name = "Web Subnet 2"
  }
  }
  # Creating 1st application subnet
  resource "aws_subnet" "application-subnet-1" {
    vpc_id                  = "${aws_vpc.demovpc.id}"
    cidr_block             = "${var.subnet2_cidr}"
    map_public_ip_on_launch = false
    availability_zone = "us-east-1a"
  tags = {
    Name = "Application Subnet 1"
  }
  }
  # Creating 2nd application subnet
  resource "aws_subnet" "application-subnet-2" {
    vpc_id                  = "${aws_vpc.demovpc.id}"
    cidr_block             = "${var.subnet3_cidr}"
    map_public_ip_on_launch = false
    availability_zone = "us-east-1b"
  tags = {
    Name = "Application Subnet 2"
  }
  }
  # Create Database Private Subnet
  resource "aws_subnet" "database-subnet-1" {
    vpc_id            = "${aws_vpc.demovpc.id}"
    cidr_block        = "${var.subnet4_cidr}"
    availability_zone = "us-east-1a"
  tags = {
    Name = "Database Subnet 1"
  }
  }
  # Create Database Private Subnet
  resource "aws_subnet" "database-subnet-2" {
    vpc_id            = "${aws_vpc.demovpc.id}"
    cidr_block        = "${var.subnet5_cidr}"
    availability_zone = "us-east-1a"
  tags = {
    Name = "Database Subnet 1"
  }
  }
Step 3:- Create a file for the Internet Gateway
Create igw.tf file and add the below code to it
  # Creating Internet Gateway
  resource "aws_internet_gateway" "demogateway" {
    vpc_id = "${aws_vpc.demovpc.id}"
  }
Step 4:- Create a file for the Route table
Create route_table_public.tf file and add the below code to it
  # Creating Route Table
  resource "aws_route_table" "route" {
    vpc_id = "${aws_vpc.demovpc.id}"
  route {
        cidr_block = "0.0.0.0/0"
        gateway_id = "${aws_internet_gateway.demogateway.id}"
    }
  tags = {
        Name = "Route to internet"
    }
  }
  # Associating Route Table
  resource "aws_route_table_association" "rt1" {
    subnet_id = "${aws_subnet.demosubnet.id}"
    route_table_id = "${aws_route_table.route.id}"
  }
  # Associating Route Table
  resource "aws_route_table_association" "rt2" {
    subnet_id = "${aws_subnet.demosubnet1.id}"
    route_table_id = "${aws_route_table.route.id}"
  }
In the above code, I am creating a new route table and forwarding all the requests to the 0.0.0.0/0 CIDR block.
I am also attaching this route table to the subnet created earlier. So, it will work as the Public Subnet
Step 5:- Create a file for EC2 instances
Create ec2.tf file and add the below code to it
  # Creating 1st EC2 instance in Public Subnet
  resource "aws_instance" "demoinstance" {
    ami                         = "ami-087c17d1fe0178315"
    instance_type               = "t2.micro"
    count                       = 1
    key_name                    = "tests"
    vpc_security_group_ids      = ["${aws_security_group.demosg.id}"]
    subnet_id                   = "${aws_subnet.demoinstance.id}"
    associate_public_ip_address = true
    user_data                   = "${file("data.sh")}"
  tags = {
    Name = "My Public Instance"
  }
  }
  # Creating 2nd EC2 instance in Public Subnet
  resource "aws_instance" "demoinstance1" {
    ami                         = "ami-087c17d1fe0178315"
    instance_type               = "t2.micro"
    count                       = 1
    key_name                    = "tests"
    vpc_security_group_ids      = ["${aws_security_group.demosg.id}"]
    subnet_id                   = "${aws_subnet.demoinstance.id}"
    associate_public_ip_address = true
    user_data                   = "${file("data.sh")}"
  tags = {
    Name = "My Public Instance 2"
  }
  }
I have used the userdata to configure the EC2 instance, I will discuss data.sh file later in the article
Step 6:- Create a file for Security Group for the FrontEnd tier
Create web_sg.tf file and add the below code to it
  # Creating Security Group
  resource "aws_security_group" "demosg" {
    vpc_id = "${aws_vpc.demovpc.id}"
  # Inbound Rules
  # HTTP access from anywhere
  ingress {
    from_port   = 80
    to_port     = 80
    protocol    = "tcp"
    cidr_blocks = ["0.0.0.0/0"]
  }
  # HTTPS access from anywhere
  ingress {
    from_port   = 443
    to_port     = 443
    protocol    = "tcp"
    cidr_blocks = ["0.0.0.0/0"]
  }
  # SSH access from anywhere
  ingress {
    from_port   = 22
    to_port     = 22
    protocol    = "tcp"
    cidr_blocks = ["0.0.0.0/0"]
  }
  # Outbound Rules
  # Internet access to anywhere
  egress {
    from_port   = 0
    to_port     = 0
    protocol    = "-1"
    cidr_blocks = ["0.0.0.0/0"]
  }
  tags = {
    Name = "Web SG"
  }
  }
I have opened 80,443 & 22 ports for the inbound connection and I have opened all the ports for the outbound connection
Step 7:- Create a file for Security Group for the Database tier
Create database_sg.tf file and add the below code to it
  # Create Database Security Group
  resource "aws_security_group" "database-sg" {
    name        = "Database SG"
    description = "Allow inbound traffic from application layer"
    vpc_id      = aws_vpc.demovpc.id
  ingress {
    description     = "Allow traffic from application layer"
    from_port       = 3306
    to_port         = 3306
    protocol        = "tcp"
    security_groups = [aws_security_group.demosg.id]
  }
  egress {
    from_port   = 32768
    to_port     = 65535
    protocol    = "tcp"
    cidr_blocks = ["0.0.0.0/0"]
  }
  tags = {
    Name = "Database SG"
  }
  }
I have opened 3306 ports for the inbound connection and I have opened all the ports for the outbound connection.
Step 8:- Create a file Application Load Balancer
Create alb.tf file and add the below code to it
  # Creating External LoadBalancer
  resource "aws_lb" "external-alb" {
    name               = "External LB"
    internal           = false
    load_balancer_type = "application"
    security_groups    = [aws_security_group.demosg.id]
    subnets            = [aws_subnet.public-subnet-1.id, aws_subnet.public-subnet-1.id]
  }
  resource "aws_lb_target_group" "target-elb" {
    name     = "ALB TG"
    port     = 80
    protocol = "HTTP"
    vpc_id   = aws_vpc.demovpc.id
  }
  resource "aws_lb_target_group_attachment" "attachment" {
    target_group_arn = aws_lb_target_group.external-alb.arn
    target_id        = aws_instance.demoinstance.id
    port             = 80
  depends_on = [
    aws_instance.demoinstance,
  ]
  }
  resource "aws_lb_target_group_attachment" "attachment" {
    target_group_arn = aws_lb_target_group.external-alb.arn
    target_id        = aws_instance.demoinstance1.id
    port             = 80
  depends_on = [
    aws_instance.demoinstance1,
  ]
  }
  resource "aws_lb_listener" "external-elb" {
    load_balancer_arn = aws_lb.external-alb.arn
    port              = "80"
    protocol          = "HTTP"
  default_action {
    type             = "forward"
    target_group_arn = aws_lb_target_group.external-alb.arn
  }
  }
The above load balancer is of type external
Load balancer type is set to application
The aws_lb_target_group_attachment resource will attach our instances to the Target Group.
The load balancer will listen requests on port 80
Step 9:- Create a file for the RDS instance
Create a rds.tf file and add the below code to it
  # Creating RDS Instance
  resource "aws_db_subnet_group" "default" {
    name       = "main"
    subnet_ids = [aws_subnet.database-subnet-1.id, aws_subnet.database-subnet-1.id]
  tags = {
    Name = "My DB subnet group"
  }
  }
  resource "aws_db_instance" "default" {
    allocated_storage      = 10
    db_subnet_group_name   = aws_db_subnet_group.default.id
    engine                 = "mysql"
    engine_version         = "8.0.20"
    instance_class         = "db.t2.micro"
    multi_az               = true
    name                   = "mydb"
    username               = "username"
    password               = "password"
    skip_final_snapshot    = true
    vpc_security_group_ids = [aws_security_group.database-sg.id]
  }
In the above code, you need to change the value of username & password
multi-az is set to true for the high availability
Step 10:- Create a file for outputs
Create outputs.tf file and add the below code to it
  # Getting the DNS of load balancer
  output "lb_dns_name" {
    description = "The DNS name of the load balancer"
    value       = "${aws_lb.external-alb.dns_name}"
  }
From the above code, I will get the DNS of the application load balancer.
Step 11:- Create a file for variable
Create vars.tf file and add the below code to it
  # Defining CIDR Block for VPC
  variable "vpc_cidr" {
    default = "10.0.0.0/16"
  }
  # Defining CIDR Block for 1st Subnet
  variable "subnet_cidr" {
    default = "10.0.1.0/24"
  }
  # Defining CIDR Block for 2nd Subnet
  variable "subnet1_cidr" {
    default = "10.0.2.0/24"
  }
  # Defining CIDR Block for 3rd Subnet
  variable "subnet2_cidr" {
    default = "10.0.3.0/24"
  }
  # Defining CIDR Block for 3rd Subnet
  variable "subnet2_cidr" {
    default = "10.0.4.0/24"
  }
  # Defining CIDR Block for 3rd Subnet
  variable "subnet2_cidr" {
    default = "10.0.5.0/24"
  }
  # Defining CIDR Block for 3rd Subnet
  variable "subnet2_cidr" {
    default = "10.0.6.0/24"
  }
Step 12:- Create a file for user data
Create data.sh file and add the below code to it
  #!/bin/bash
  yum update -y
  yum install -y httpd.x86_64
  systemctl start httpd.service
  systemctl enable httpd.service
  echo "Hello World from $(hostname -f)" > /var/www/html/index.html
The above code will install an apache webserver in the EC2 instances
So, now our entire code is ready. We need to run the below steps to create infrastructure.
terraform init is to initialize the working directory and downloading plugins of the provider
terraform plan is to create the execution plan for our code
terraform apply is to create the actual infrastructure. It will ask you to provide the Access Key and Secret Key in order to create the infrastructure. So, instead of hardcoding the Access Key and Secret Key, it is better to apply at the run time.
Step 13:- Verify the resources
Terraform will create below resources
VPC
Application Load Balancer
Public & Private Subnets
EC2 instances
RDS instance
Route Table
Internet Gateway
Security Groups for Web & RDS instances
Route Table
Once the resource creation finishes you can get the DNS of a load balancer and paste it into the browser and you can see load balancer will send the request to two instances.
That’s it now, you have learned how to create various resources in AWS using Terraform.